
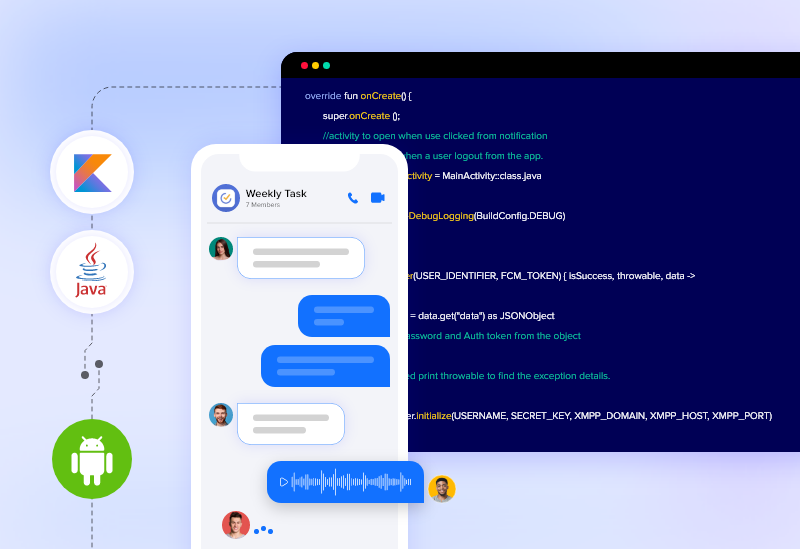
In this article, you’ll learn how to build and run your first Android Chat app in Java or Kotlin.
A Quick-note
This guided article is written for developers, assuming that you already know Java or Kotlin. Whether you are an experienced programmer or a beginner, you will likely be able to learn how to add messaging functionalities to your app in simple steps, using SDKs.
What You’ll Learn
- How to Android Studio to Build Your App
- How to add the Chat SDKs to your App
- Process of connecting your app to the Chat Server
- How to register a user
- How to set up sending and receiving messages to your own app.
What you’ll need before Developing an Android Chat app
For the development process, you’ll need a computer that can run the following:
- Android Studio IDE 3.6 or higher
- Android Lollipop 5.0 (API Level 21) or above
- MirrorFly Chat SDK
- Java 7 or higher
- Gradle 4.1.0 or higher
Build a Chat App Like Discord: Step-by-Step Development Process
10 Steps to Build an Android Chat App Using Java
Step 1: Create Your Android Studio Project
Android Studio is the official IDE to develop Android App. It is based on JetBrains’ IntelliJ IDEA software, providing a context-aware environment to write apps in Java and JVM languages like Kotlin.
- To create a new project in Android Studio, install the latest version of Android Studio IDE
- Once the IDE is installed and successfully launched, a Welcome Window will appear.
- On this page, select the option – Start a new Android Studio project
Next, on the activity page, I’d recommend beginners to choose Empty Activity.
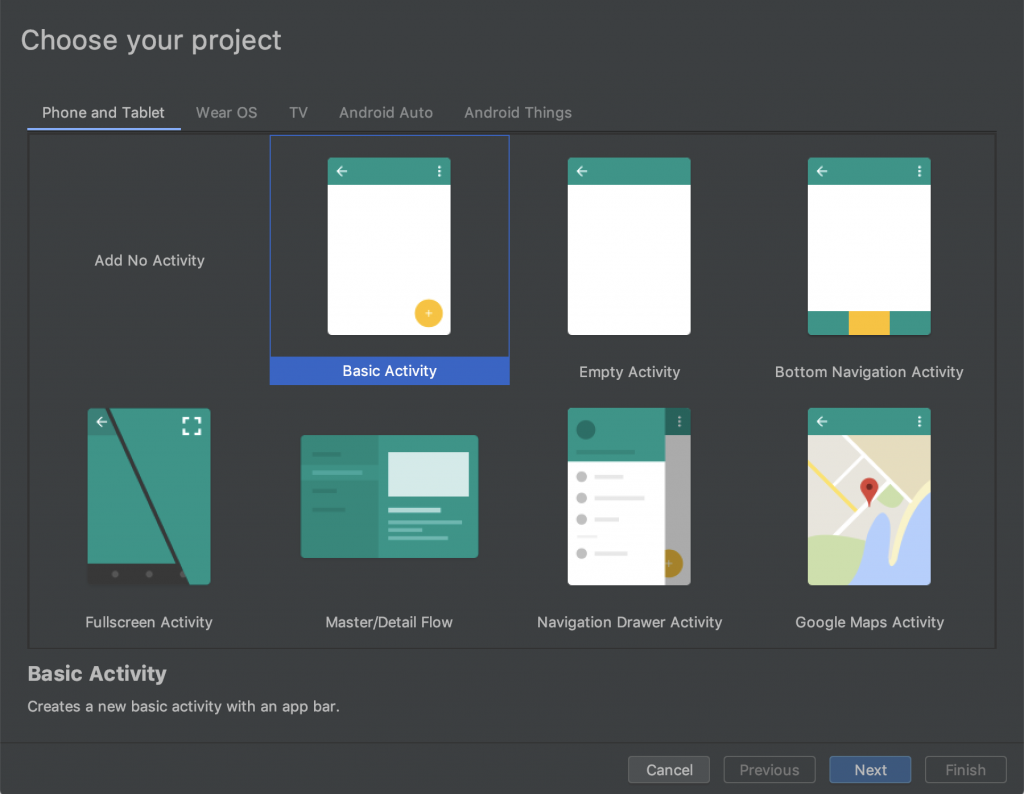
- This will take you to the Configuration Window.
- Here, you’ll have to configure your project by assigning the Application Name of your choice.
- Choose Java or Kotlin from the language’s dropdown menu as per your preference.

- Select the minimum SDK level as Android Lollipop 5.0 (API Level 21) or above. Below this version, your app may not operate on user devices. The other fields may hold the default values
Note: In Android Studio, different XML files are created to provide functionalities to the UI of your app.

- Complete Source Code
- Lifetime Data Ownership
- Deploy on Own Server
Step 2: Import the Build Dependencies into Your Project’s Library
Dependencies are SDK modules that need to be imported into the project to create libraries that organize the app’s files in a functional and orderly manner.
You can download these modules from MirrorFly’s official website by creating your own account .
If you’ll need help with the steps to download their SDKs – here is the link to their guided documentation
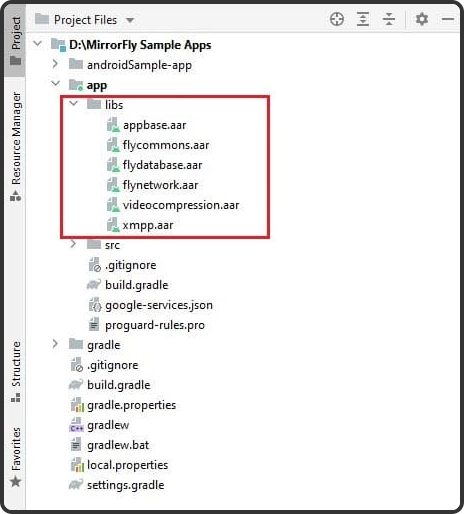
Once you download the SDKs, you can extract the AAR files that contain all the chat room feature modules needed to build your real time chat application.
To begin the import, navigate to Gradle Scripts > build.gradle
In this location, you will find 2 gradle files – one for the project and another for the app.
You must import the dependencies to the app gradle displaying as app/build.gradle, in order to sort the functionalities of the app in one place.
Your import will include:
- appbase.aar
- flycommons.aar
- flynetwork.aar
- flydatabase.aar
- videocompression.aar
- xmpp.aar
On completion, your library folder will be created as below in the app/build.gradle:
Next, you need to paste these lines below the plugins{} inside the android {} tag
plugins {
    ...
    id 'kotlin-android'
    id 'kotlin-kapt'
}

android {
    compileOptions {
        sourceCompatibility JavaVersion.VERSION_1_8
        targetCompatibility JavaVersion.VERSION_1_8
    }

    kotlinOptions {
        jvmTarget = '1.8'
    }

    packagingOptions {
        exclude 'META-INF/AL2.0'
        exclude 'META-INF/DEPENDENCIES'
        exclude 'META-INF/LICENSE'
        exclude 'META-INF/LICENSE.txt'
        exclude 'META-INF/license.txt'
        exclude 'META-INF/NOTICE'
        exclude 'META-INF/NOTICE.txt'
        exclude 'META-INF/notice.txt'
        exclude 'META-INF/ASL2.0'
        exclude 'META-INF/LGPL2.1'
        exclude("META-INF/*.kotlin_module")
    }

}
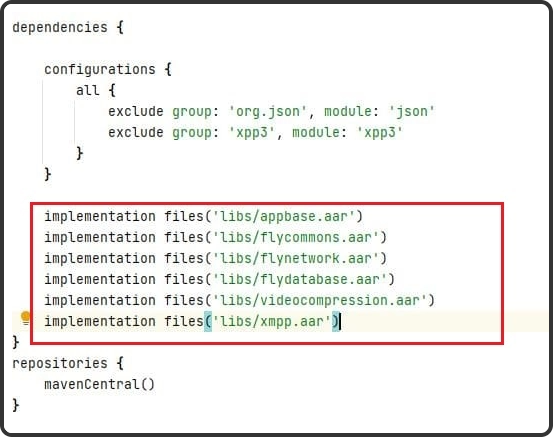
Now, add the below lines inside dependencies{} below the configurations{} tag :
dependencies {

     ... // your app dependencies

     implementation files('libs/appbase.aar')
     implementation files('libs/flycommons.aar')
     implementation files('libs/flynetwork.aar')
     implementation files('libs/flydatabase.aar')
     implementation files('libs/videocompression.aar')
     implementation files('libs/xmpp.aar')

 }
In the next step, add the below dependencies that serve different purposes to the SDKs as explained ahead.
- Lifecycle Listener: This module has all the information about the app’s activity and keeps track of it
- GreenDao: This is an open-source object-relational mapping component that maps the objects in the project to SQLite databases
- gson parsing: This process is done to convert Java objects into equivalent JSON reps
- Smack implementation: This is an open-source XMPP client library that allows easy exchange of data
- Dagger Dependencies is a framework that’s used to mimic codes at compile time that otherwise might have been handwritten
- Coroutines: These are lightweight threads that help manage long-running tasks by taking a block of code to run concurrently with the other codes in the project
- Stetho interceptor: This is an open-source debug tool that troubleshoots network traffic and sends data using HTTP web sockets
- OkHttp interceptor: This is a powerful debugging tool used to monitor, rewrite and retry calls made, especially using APIs
- Shared preference encryption: These are objects that represent files containing small collections of key-value pairs that are easy to read and write and can be saved in private or shared preferences.
The above-stated activities can be performed by adding the below lines into the app dependencies
 dependencies {

     ... // your app dependencies

     configurations {
         all {
             exclude group: 'org.json', module: 'json'
             exclude group: 'xpp3', module: 'xpp3'
         }
     }

     //For lifecycle listener
     implementation 'android.arch.lifecycle:extensions:1.1.1'
     annotationProcessor 'android.arch.lifecycle:compiler:1.1.1'

     //For GreenDao
     implementation 'de.greenrobot:greendao:2.1.0'

     //For gson parsing
     implementation 'com.google.code.gson:gson:2.8.1'

     //for smack implementation
     implementation 'org.igniterealtime.smack:smack-android:4.4.4'
     implementation 'org.igniterealtime.smack:smack-tcp:4.4.4'
     implementation 'org.igniterealtime.smack:smack-im:4.4.4'
     implementation 'org.igniterealtime.smack:smack-extensions:4.4.4'
     implementation 'org.igniterealtime.smack:smack-sasl-provided:4.4.4'

     implementation 'androidx.localbroadcastmanager:localbroadcastmanager:1.0.0'
     implementation 'androidx.multidex:multidex:2.0.1'
     implementation 'com.google.android.gms:play-services-location:17.0.0'

     //Dagger Dependencies
     api 'com.google.dagger:dagger:2.40.5'
     kapt 'com.google.dagger:dagger-compiler:2.40.5'
     api 'com.google.dagger:dagger-android:2.40.5'
     api 'com.google.dagger:dagger-android-support:2.40.5'
     kapt 'com.google.dagger:dagger-android-processor:2.40.5'

     //coroutines
     implementation 'org.jetbrains.kotlinx:kotlinx-coroutines-android:1.3.8'
     implementation 'org.jetbrains.kotlinx:kotlinx-coroutines-test:1.3.8'

     //apicalls
     implementation 'com.squareup.retrofit2:retrofit:2.6.1'
     implementation 'com.squareup.retrofit2:converter-gson:2.6.1'
     implementation 'com.squareup.okhttp3:okhttp:4.2.0'
     implementation 'com.jakewharton.retrofit:retrofit2-kotlin-coroutines-adapter:0.9.2'

     //stetho interceptor
     implementation 'com.facebook.stetho:stetho-okhttp3:1.3.1'

     //okhttp interceptor
     implementation 'com.squareup.okhttp3:logging-interceptor:3.14.3'

     //shared preference encryption
     implementation 'androidx.security:security-crypto:1.1.0-alpha03'

 }
Step 3: Work on the Manifest Permissions
The Manifest is the component that defines every element used in the project. Hence it is essential to configure it with the necessary permissions
First, add the below line in the gradle.properties file to avoid any library conflicts among the imported dependencies.
android.enableJetifier=trueNow, add the internet and network access permissions by navigating to app > manifests > AndroidManifest.xml
<uses-permission android:name="android.permission.INTERNET" />
<uses-permission android:name="android.permission.ACCESS_NETWORK_STATE" />
Step 4: Authenticate the SDK
In the builder configuration, update the License Key acquired from your MirrorFly account. This allows the server to authenticate the SDK with the necessary credentials.
buildTypes {
  debug {
    buildConfigField 'String', 'SDK_BASE_URL', '"https://api-preprod-sandbox.mirrorfly.com/api/v1/"'
    buildConfigField 'String', 'LICENSE', '"xxxxxxxxxxxxxxxxxxxxxxxxx"'
    buildConfigField 'String', 'WEB_CHAT_LOGIN', '"https://webchat-preprod-sandbox.mirrorfly.com/"'
    buildConfigField "String", "SUPPORT_MAIL", '"contussupport@gmail.com"'
  }
}
After this step, you may need to perform the gradle sync operation to see the changes take effect.
Locate the gradle sync icon as shown below:
Otherwise, navigate to File > Sync Project with Gradle Files
Note: I’d recommend you restart Android studio after this activity.
Step 5: Initialize your Chat SDK
To simplify the SDK initialization process, use a builder class to construct the objects step by step.
To start the SDK,
- Go to the Application Class
- Call the onCreate() method
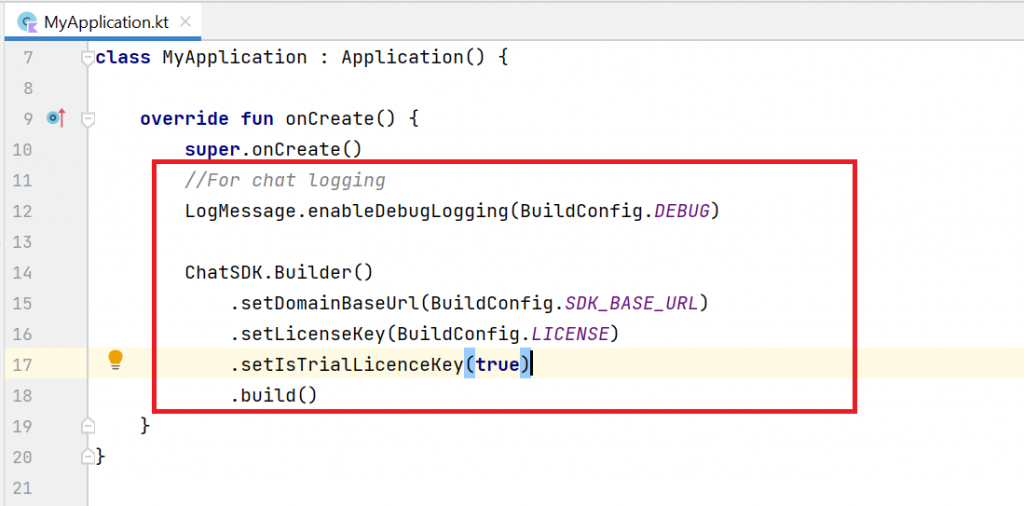
Note: From this step of the guide, I will provide the codes of both Java and Kotlin. You may choose the language you need among them, to build your app in your preferred language.
To debug if there are any issues among the large amounts of data and system logs, use the below codes:
Java
//For chat logging
LogMessage.enableDebugLogging(BuildConfig.DEBUG);

new ChatSDK.Builder()
    .setDomainBaseUrl(BuildConfig.SDK_BASE_URL)
    .setLicenseKey(BuildConfig.LICENSE)
    .setIsTrialLicenceKey(true)
    .build();
Kotlin
//For chat logging
LogMessage.enableDebugLogging(BuildConfig.DEBUG)

ChatSDK.Builder()
    .setDomainBaseUrl(BuildConfig.SDK_BASE_URL)
    .setLicenseKey(BuildConfig.LICENSE)
    .setIsTrialLicenceKey(true)
    .build()
Step 6: Register Your App User
In the sandbox live mode, register a user by adding the following code:
Java
  FlyCore.registerUser(USER_IDENTIFIER, (isSuccess, throwable, data ) -> {
        if(isSuccess) {
            Boolean isNewUser = (Boolean) data.get("is_new_user");
            JSONObject responseObject = (JSONObject) data.get("data");
           // Get Username and password from the object
        } else {
           // Register user failed print throwable to find the exception details.
        }
   });
Kotlin
  FlyCore.registerUser(USER_IDENTIFIER) { isSuccess, throwable, data ->
        if(isSuccess) {
            val isNewUser = data["is_new_user"] as Boolean
            val responseObject = data.get("data") as JSONObject
            // Get Username and password from the object
        } else {
            // Register user failed print throwable to find the exception details.
        }
     }
Step 7: Connect the Chat SDK to MirrorFly Server
The Chat SDKs in different user devices must be connected to the server so that they can send and receive messages to each other. We’ll use the below code to perform this:
Java
    ChatManager.connect(new ChatConnectionListener() {
         @Override
         public void onConnected() {
             // Write your success logic here to navigate Profile Page or
             // To Start your one-one chat with your friends
         }

         @Override
         public void onDisconnected() {
            // Connection disconnected
            //No need implementations
         }

        @Override
         public void onConnectionNotAuthorized() {
            // Connection Not authorized
            //No need implementations
        }
    });
Kotlin
    ChatManager.connect(object : ChatConnectionListener {
          override fun onConnected() {
               // Write your success logic here to navigate Profile Page or
               // To Start your one-one chat with your friends
          }

          override fun onDisconnected() {
              // Connection disconnected
              //No need implementations
         }

        override fun onConnectionNotAuthorized() {
             // Connection Not authorized
             //No need implementations
       }
   })
Step 8: Send an Instant One-to-One Message
Now it’s time to set up the app to send a message to other user devices. Use the below code to do this:
Java
  FlyMessenger.sendTextMessage(TO_JID, TEXT, new SendMessageListener() {
            @Override
            public void onResponse(boolean isSuccess, @Nullable ChatMessage chatMessage) {
                // you will get the message sent success response
            }
        });
Kotlin
 FlyMessenger.sendTextMessage(TO_JID, TEXT, listener = object : SendMessageListener {
        override fun onResponse(isSuccess: Boolean, chatMessage: ChatMessage?) {
           // you will get the message sent success response
        }
})
Step 9: Receive Messages from Other Users
Now, add the below lines of code to add the functionality of receiving messages to your app from other user devices
Java
public class MainActivity extends FlyBaseActivity { }
Kotlin
class MainActivity : FlyBaseActivity()
Recommended Reading
Step 10: Submit your app to Playstore
Once you’ve completed all these steps, you may make the necessary configurations for the look and feel of your app in the Android Studio IDE and submit your app to the Google Playstore to get it live instantly. This SDK integration is a quick and easy process. However, if you need a backup team, you can get consult from mobile development experts or hire a dedicated team of developers
Conclusion
So yes, Congratulations!
I appreciate your efforts to come all the way to this part of the article to learn the know-how of building an instant messaging app using MirrorFly Chat SDKs.
To give a quick recap, we walked through the complete process of building a Chat app for Android devices using Java and Kotlin. This app is built with SDKs that allow app users to send and receive messages at ultra-low latencies. It can deliver a seamless interaction experience with zero downtime and a record-breaking average response rate.
No, we don’t stop there!
Our SDKs allow you to add many other exciting chat features to your app.
A few of them are listed below for you to explore conveniently:
- MirrorFly Group chat Module
- MirrorFly Push Notifications
- Firebase Integration with MirrorFly Chat SDK
- MirrorFly Callback Listeners
The chat app built with MirrorFly can be used for any number of use-cases and across different vertices. All you need to do is quickly Get a MirrorFly Account and get World Converse via your app!
Get Started with MirrorFly’s Real-time Messaging Features
Drive 1+ billions of conversations on your Java apps with highly secure 250+ real-time Communication Features.
Contact Sales 200+ Happy Clients
-
Topic-based Chat
-
Multi-tenancy Support

What is the cost of building Kotlin chat app?
- Building a Kotlin chat app typically costs between $30,000 and $70,000. The price depends on how complex the app is, the features included, and the size or expertise of the development team.
- Design: $2,500 to $5,000 for creating the look and feel of the app.
- iOS/Android Development: $30,000 to $65,000 for coding the app to work on mobile devices.
- Back-End Development: $25,000 to $40,000 for setting up the server-side system that powers the app.
This is why we recommend using a white-label solution (a pre-built app you can customize) that can lower the cost to about $13,000.
Which SDK to use for Kotlin?
For Cloud-Based Apps: If your app uses Amazon Web Services (like S3 for storage, EC2 for servers, or DynamoDB for databases), use the AWS SDK for Kotlin. It works with both JVM-based projects and Android apps running on devices with Android 7.0 (API level 24) or higher.
For Messaging Apps: If you’re building a chat app with lots of features, check out the MirrorFly chat SDK. It comes with over 1,000 options you can customize to fit your app’s needs.
Which API is best for Android app development?
Here are some top picks:
- MirrorFly Chat API: Great for adding custom messaging features to your app.
- Android Studio API: A beginner-friendly development toolkit that works with Java and Kotlin.
- Google Maps API: Perfect if your app needs location-based features like maps or directions.
- Crashlytics: A reliable tool to track and fix app crashes.
- Google Ads API: Ideal for integrating advertising into your app.
- Flurry Analytics: A powerful option for tracking how users interact with your app.
Which language is best for Android app development Java or Kotlin?
Kotlin is now the go-to language for building Android apps. It’s more modern and helps you write safer, less error-prone code compared to Java. While Java is still useful and widely used, Kotlin offers better features, has official support from Google, and allows developers to work more efficiently. While the decision completely depends on the needs of your project, Kotlin is generally seen as the better choice for creating forward-thinking, modern apps.
Can I make Android app using Kotlin?
Absolutely, you can use Kotlin to build Android apps. It’s officially supported by Google and is already used by more than 60% of professional Android developers for the following reasons:
- It has a simple and clear syntax, which helps reduce coding mistakes.
- It works seamlessly with existing Java-based apps.
- It’s fully compatible with Java, so you can use both languages together.
Android Studio provides great support for Kotlin, including tools to convert Java code into Kotlin. This makes it easier to switch or start fresh with Kotlin. Overall, Kotlin is a powerful, modern language that’s perfect for building Android apps efficiently.
How to implement chat in Android Kotlin?
Steps to create a chat app for Android using Kotlin, you can use the MirrorFly SDK for an easy and smooth setup.
Step 1: Set up your project in Android Studio.
Step 2: Get a MirrorFly SDK license key.
Step 3: Follow the integration steps, which include:
-
- Initializing the SDK.
- Registering users.
- Connecting to the chat server.
MirrorFly lets you add real-time messaging features in as little as 30 minutes and the SDK has built-in tools to let you send and receive messages effortlessly.
What are the essential features of a chat app?
- Private & group messaging
- File sharing
- Voice/video calling
- Push notifications
- Video Conferencing
- Voice Broadcasting
- Live Streaming
- Topic-based chat
- Indicators (Delivery/ Typing)
- Chat Moderation Tools
- Profanity filters
And a lot more are the trending features amongst modern chat app users.
This guy is a blogging freak. He craves to blend the finest words to deliver meaningful, informative content in the most engaging way. This dude loves to craft content on tech blogs with a thorough piece of information. When he’s not writing, researching, or editing, you can catch him riding into unknown terrains and scribbling quotes.
Good afternoon. I found information on the site that you have examples of integrating your platform with games. What language and what engine were these games written in? We develop games using Unity and Unreal Engine.
Hi, our sites has more than 100,000 users visit last month (400k, est). However, there are only 30k active users. Most of the visits are just new users that might not end up registe. Still, we want to expose the chat feature to them. (They can only see chat message/history — cant send message) We want to discuss about how MirrorFly calculate MAU, price.
Hello Guys, We are looking for webrtc solutions or services with the help of services we need to achieve these features below. 1. Audio/Video conferencing solution support 60 users in one room 2. RTMP and HLS Broadcasting solutions support 300 users in one webinar 3. Recording for Video Conferencing and Broadcasting solutions 4. On-Premises server 5. Encryption 6. Whiteboard, Share screen/files, invite guests to a room 7. Voting,Polling, Questions & answers 8. SIP/VoIP 9. Low bandwidth support 10. Simulcast & Audio/Video Transcoding 11. Analytics 12. Load Balancing and Auto Scaling Looking forward to connecting My email id to connect
We are an enterprise software company for suppliers. Would like to discuss the feasibility of adding chat into our android applications for our customers.
Hi, I work at DarkMode with is an entity that works for cricket Teams and Leagues in AU . One of our services is the Live Streaming Platform and we would like to enhance our features with a Live Chat. Could you please confirm if you have web solution and SDK for Android and IOS? If yes, what is the funcionaliities that the chat have (moderation, GIFs, pool, etc)? Regards, arol